Large Format Camera Alignment - II
24/01/11 18:00
Aligning a large format camera used to be a case of checking all the spirit levels and zeroing scales. According to traditional CoC (“Circle of Confusion”) values for film, an error of as much as 1 millimetre from corner to corner would be absorbed if the lens was set to f/8 — usually photographers would use much smaller apertures than that.
As described in Part 1, Digital photography requires greater accuracy. A company called Zig-Align in California developed a method of optical alignment using very accurately manufactured mirrors. I’ve recently converted to this system, and this is how it works:
Step 1 - Assembling the mirrors
Basic camera alignment requires two mirrors and two lens boards (see Fig. 1). One mirror is large and rectangular. The other mirror is circular, with a viewing hole and a ground or etched ring around the outer edge. It’s known as the ring module. Lens boards must be accurately made and flat (see below).
Zig-Align provide strong, thin, double-sided tape for attaching the mirrors. They recommend that a few small squares are preferable: enough to secure the mirror firmly, but not so much that it can’t be removed again later.

Fig. 1: Zig-Align plain mirror (left) and ring module (right) on two flat lens boards.
Step 2 - Preparing the camera
The boards are fitted to the camera in place of the normal lens board and film carrier, mirrors facing towards each other.
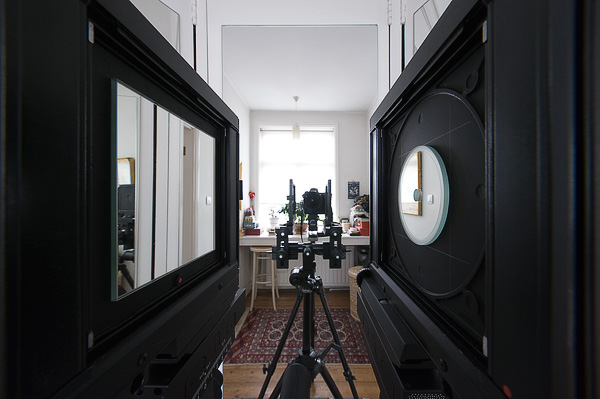
Fig. 2: Zig-Align mirrors set up on a camera. Machined reference points can be seen as small silver marks in each corner.
Step 3 - Checking alignment
Look through the hole. The clearest view is with good light and no bellows fitted, but it also works with a torch in the bellows. If the view is like Fig. 3 then the mirrors are not parallel. If you see a series of concentric circles in Fig. 4, then the mirrors are parallel.
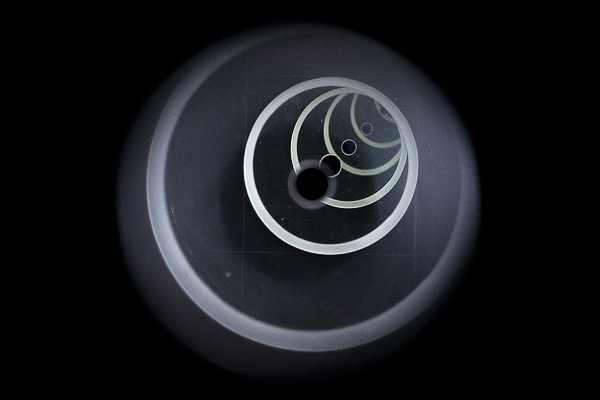
Fig. 3: View through the ring module — mirrors not parallel.
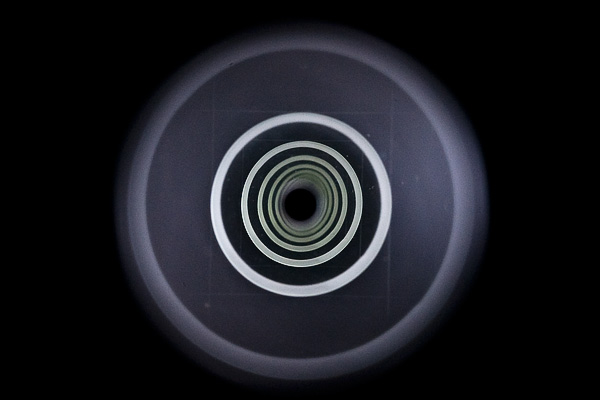
Fig. 4: View through the ring module — rings perfectly concentric — mirrors parallel.
Step 4 - Checking the lens boards
At this point, check that the lens boards are flat. This only needs to be done with a new installation or if you suspect something has been damaged. Obviously, this method will only work if the lens board is square and can be fitted in four possible positions. Not all LF cameras use square boards.
Test one board at a time. Remove it, rotate it 90 degrees, fit it back on the camera and check the alignment. Check all four positions and make sure the rings are perfectly concentric in each position. If so, then this set of mirrors and boards is reliable.
Step 5 (optional) - Adjust the detents and zero positions
Warning: Your camera is a precious, precision instrument and you can damage it if you don’t know what you’re doing, resulting in expense, anguish and lost earnings. If in doubt, do not attempt this step, but have it checked and carried out by an reputable repair shop that has experience, tools and equipment for your kind of camera.
Both my cameras have spring-ball detents for the zero positions. They would have been set up very accurately when the cameras were new, using jigs and dial gauges. Over time, wear, force, drops, thumps, and perhaps a mix of old and new parts, caused these positions to drift. In my case, I knew I had a problem with horizontal sharpness on the P2 and vertical sharpness on the Norma. I was pleased when this was confirmed by the mirrors, and knew roughly what adjustments might be needed.
On the P2, the swing detent is provided by a ball and spring in an eccentric bush, locked from accidental movement by two screw adjusters. Backing off one screw and advancing the other allowed very fine adjustment, but the screws were soft. That means they could have been easily burred with the wrong screwdriver, or the threads stripped with too much torque. Previous experience gave me confidence to do the work, but again, if in doubt, take yours to an expert.

Fig. 5: The spring-ball detent for swing movements on a Sinar P2, in an eccentric bush, or cam.
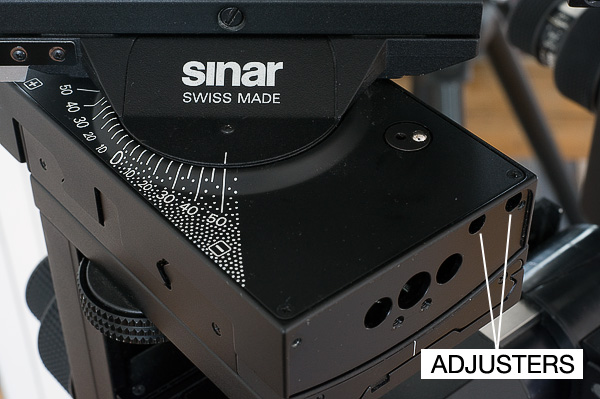
Fig. 6: The heads of small adjustment screws are in these holes.
The Norma is a fraction of the weight of the P2, and the rail clamp gives it a lower profile when carried. I use it when I have to lug the whole shooting match a long way, or on public transport. Again, the detent was a ball and spring in an eccentric held with two screw-adjusters. The camera is older than I am and I was not surprised to find evidence of earlier adjustment.
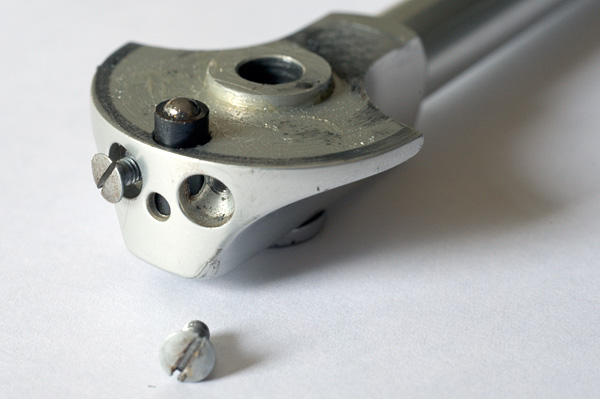
Fig. 7: The tilt spring-ball detent on a Sinar Norma.
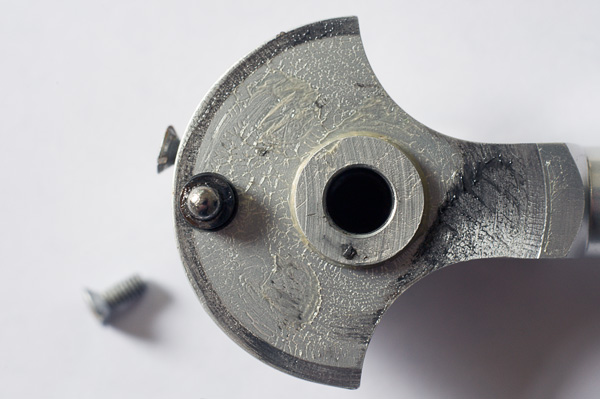
Fig. 8: The eccentricity of the bush changes the detent position when the bush is rotated.
Accuracy
I double checked the accuracy of all settings with engineering tools. The repair manual for the Sinar P2 quotes a maximum tolerance of 0.10 MM between two reference points that are 135 MM apart. This is an interesting figure, because calculations for 5x4” film show that the error can be covered by depth of field with a lens set to f/5.6. This is the wide-open aperture of most large format lenses.
Digital sensors are smaller, therefore a 0.10 MM error at the reference points will be approximately 0.04 MM across the sensor, but accuracy is more critical. Calculations based on a CoC of 0.035 also predicted a sharp image at f/5.6.
With the Zig-Align mirrors I achieved an accuracy of 0.02 MM between opposite reference points. I am very impressed. I now have a system for setting up a camera in the field that is very fast, with a level of accuracy at least as good as the original factory specification.
As described in Part 1, Digital photography requires greater accuracy. A company called Zig-Align in California developed a method of optical alignment using very accurately manufactured mirrors. I’ve recently converted to this system, and this is how it works:
Step 1 - Assembling the mirrors
Basic camera alignment requires two mirrors and two lens boards (see Fig. 1). One mirror is large and rectangular. The other mirror is circular, with a viewing hole and a ground or etched ring around the outer edge. It’s known as the ring module. Lens boards must be accurately made and flat (see below).
Zig-Align provide strong, thin, double-sided tape for attaching the mirrors. They recommend that a few small squares are preferable: enough to secure the mirror firmly, but not so much that it can’t be removed again later.

Fig. 1: Zig-Align plain mirror (left) and ring module (right) on two flat lens boards.
Step 2 - Preparing the camera
The boards are fitted to the camera in place of the normal lens board and film carrier, mirrors facing towards each other.

Fig. 2: Zig-Align mirrors set up on a camera. Machined reference points can be seen as small silver marks in each corner.
Step 3 - Checking alignment
Look through the hole. The clearest view is with good light and no bellows fitted, but it also works with a torch in the bellows. If the view is like Fig. 3 then the mirrors are not parallel. If you see a series of concentric circles in Fig. 4, then the mirrors are parallel.

Fig. 3: View through the ring module — mirrors not parallel.

Fig. 4: View through the ring module — rings perfectly concentric — mirrors parallel.
Step 4 - Checking the lens boards
At this point, check that the lens boards are flat. This only needs to be done with a new installation or if you suspect something has been damaged. Obviously, this method will only work if the lens board is square and can be fitted in four possible positions. Not all LF cameras use square boards.
Test one board at a time. Remove it, rotate it 90 degrees, fit it back on the camera and check the alignment. Check all four positions and make sure the rings are perfectly concentric in each position. If so, then this set of mirrors and boards is reliable.
Step 5 (optional) - Adjust the detents and zero positions
Warning: Your camera is a precious, precision instrument and you can damage it if you don’t know what you’re doing, resulting in expense, anguish and lost earnings. If in doubt, do not attempt this step, but have it checked and carried out by an reputable repair shop that has experience, tools and equipment for your kind of camera.
Both my cameras have spring-ball detents for the zero positions. They would have been set up very accurately when the cameras were new, using jigs and dial gauges. Over time, wear, force, drops, thumps, and perhaps a mix of old and new parts, caused these positions to drift. In my case, I knew I had a problem with horizontal sharpness on the P2 and vertical sharpness on the Norma. I was pleased when this was confirmed by the mirrors, and knew roughly what adjustments might be needed.
On the P2, the swing detent is provided by a ball and spring in an eccentric bush, locked from accidental movement by two screw adjusters. Backing off one screw and advancing the other allowed very fine adjustment, but the screws were soft. That means they could have been easily burred with the wrong screwdriver, or the threads stripped with too much torque. Previous experience gave me confidence to do the work, but again, if in doubt, take yours to an expert.

Fig. 5: The spring-ball detent for swing movements on a Sinar P2, in an eccentric bush, or cam.

Fig. 6: The heads of small adjustment screws are in these holes.
The Norma is a fraction of the weight of the P2, and the rail clamp gives it a lower profile when carried. I use it when I have to lug the whole shooting match a long way, or on public transport. Again, the detent was a ball and spring in an eccentric held with two screw-adjusters. The camera is older than I am and I was not surprised to find evidence of earlier adjustment.

Fig. 7: The tilt spring-ball detent on a Sinar Norma.

Fig. 8: The eccentricity of the bush changes the detent position when the bush is rotated.
Accuracy
I double checked the accuracy of all settings with engineering tools. The repair manual for the Sinar P2 quotes a maximum tolerance of 0.10 MM between two reference points that are 135 MM apart. This is an interesting figure, because calculations for 5x4” film show that the error can be covered by depth of field with a lens set to f/5.6. This is the wide-open aperture of most large format lenses.
Digital sensors are smaller, therefore a 0.10 MM error at the reference points will be approximately 0.04 MM across the sensor, but accuracy is more critical. Calculations based on a CoC of 0.035 also predicted a sharp image at f/5.6.
With the Zig-Align mirrors I achieved an accuracy of 0.02 MM between opposite reference points. I am very impressed. I now have a system for setting up a camera in the field that is very fast, with a level of accuracy at least as good as the original factory specification.